


Hey there, DIY IoT lovers! Ever construct a cool gadget along with your Raspberry Pi, solely to get caught determining the way to exhibit its information? Don’t fear, you’re not alone. A lot of makers such as you face the identical problem: turning that superior sensor information into one thing simple to see and work together with in your cellphone or laptop computer.
The excellent news is, there are easy and dependable methods to bridge that hole and make clear your information with out dropping time.
Visualize your Raspberry Pi information: Get began
Raspberry Pi and different Linux-based platforms have turn into in style within the IoT house resulting from their versatility and ease of use. Nevertheless, a standard problem is discovering an efficient strategy to visualize their information and join them to visualization platforms.
On the finish of the day, what would you like? You might have your code which is producing information and also you wish to have a dashboard to visualise it each in real-time and its historic evolution. Moreover, you want to work together straight along with your software from that dashboard too!
Let’s discover what sort of options you might have at your disposal.
Selecting a visualization platform to your Raspberry Pi
You may visualize your machine’s information by putting in a visualization platform in your machine or sending information to an exterior platform, self- or cloud-hosted. Every has its execs and cons, and the selection is determined by your expertise, time, and the complexity of the answer.
Putting in a visualization platform in your machine additionally implies establishing native information storage, like a database. This course of together with the platform set up and upkeep will be complicated and time-consuming, particularly for newcomers.
Transferring information to an exterior platform is usually simpler as they normally provide a easy API to work together with them, however the kind of answer can add complexity:
- In the event you decide to set up your personal platform and infrastructure, it could look like you might have extra management over the answer. Nevertheless, it may well rapidly turn into an amazing activity for newcomers, and ongoing upkeep will be much more difficult.
- Selecting a cloud-hosted answer typically looks as if probably the most balanced choice. Nevertheless, it can be difficult because of the big selection of options, various ranges of complexity, and pricing fashions that may be obscure.
A few of these options had been additionally described in a earlier article, the place we explored a number of methods to visualise information coming from Arduino or ESP32 primarily based boards.
Choosing the proper programming language to your Raspberry Pi
However now, what? It’s important to program your software to gather information. Deciding on the correct programming language can rely upon many various elements. Data of the setting or just your choice generally is a deciding issue. However typically the choice isn’t so easy. Right here we now have some insights about some in style IoT programming languages
- Python: Python is a best choice for IoT growth resulting from its simplicity, wealthy library ecosystem, and lively neighborhood. Its dominance in AI permits seamless integration of machine studying fashions.
- JavaScript: JavaScript, with Node.js as a server-side runtime setting, can be a go-to language for IoT machine growth. It’s versatile and its event-driven nature aligns seamlessly with IoT necessities. It’s notably in style for purposes that work together with net pages, due to the potential for vital code reuse.
- Node-RED: Lastly, low-code programming environments like Node-RED have turn into extremely popular for IoT. It permits you to create your purposes with an intuitive drag-and-drop interface, connecting {hardware} and platforms, and controlling something from tiny sensors to the cloud.
Observe: Whereas different languages like C/C++ and Rust are additionally related, this weblog submit focuses on Python, JavaScript, and Node-RED resulting from their recognition and relative ease of use.
Creating IoT monitoring dashboards with Arduino Cloud
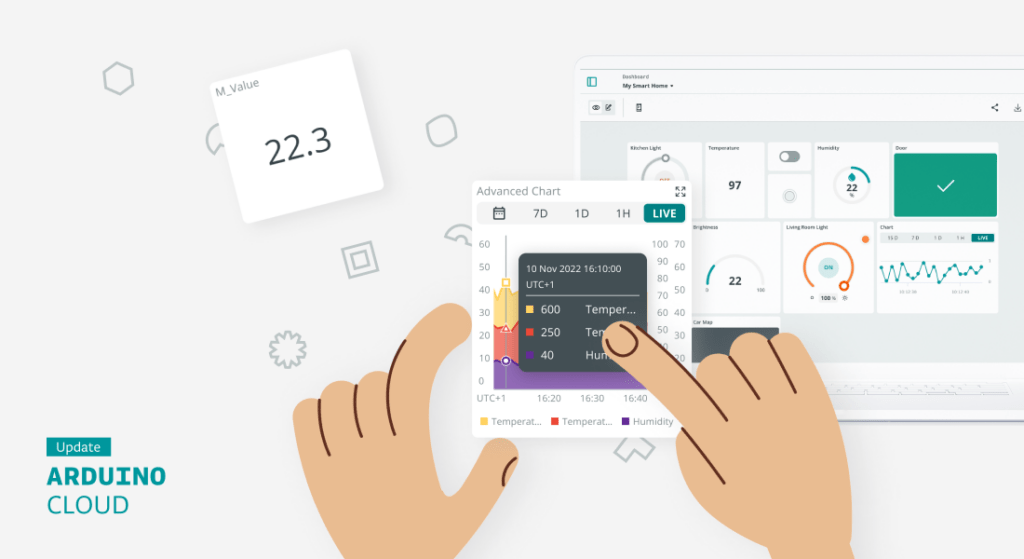
The Arduino Cloud is a cloud-hosted platform that gives a user-friendly setting to create customizable insightful dashboards used to observe and management your IoT gadgets.
We not too long ago introduced which you could now seamlessly join Python, MicroPython and JavaScript purposes with the Arduino Cloud.
The principle profit is its ease of use. You eliminate set up or upkeep complications, whilst you join your gadgets in minutes and visualize the information in your dashboards both out of your browser or your cell phone. You may create and customise your dashboards with an intuitive interface utilizing drag-and-drop widgets. These dashboards present real-time interplay along with your IoT gadgets and insightful historic data that may be moreover downloaded for offline evaluation.
However there are various different cool options:
- Actual-time alerts: You may obtain notifications primarily based on standards configured within the Cloud. Study extra on this submit.
- Cell phone app: You may entry your dashboards utilizing the IoT Distant app.
- Work collaboratively: You may share your code and dashboards with others.
- Out-of-the field integrations: You might have seamless integration with in style platforms like IFTTT, Zapier, Google Companies, Alexa or Google Dwelling.
Need to be taught extra? Take a look at this latest article asserting 4 new IoT monitoring dashboard options that will appear small, however pack an enormous punch to your linked initiatives. They embrace the flexibility to duplicate IoT Dashboards, IoT Worth Widget customization, new information aggregation technique, and extra.
How one can join your Raspberry Pi to Arduino Cloud
Connecting your Raspberry Pi to Arduino Cloud couldn’t be simpler. You solely should comply with these steps:
1. Arrange an Arduino Cloud account.
2. Add your machine to the Arduino Cloud as a Guide machine.
3. Create your Factor and add your variables.
4. Create the code to your Raspberry Pi utilizing your most popular growth language and setting.
5. Create the dashboards for information visualization.
So, do you wish to remotely monitor your Raspberry Pi creations and management them from anyplace? Keep tuned! Upcoming posts will showcase real-world examples of connecting your Raspberry Pi to the Arduino Cloud, enabling you to visualise sensor information and work together along with your initiatives remotely. Within the meantime, right here’s a mission from Undertaking Hub displaying an integration with Raspberry Pi utilizing Python to point out VCO2 information from a SGP30 sensor.
Begin with Arduino Cloud at no cost
Arduino Cloud is free to make use of. So, in the event you’re trying to streamline information visualization of your Raspberry Pi purposes, contemplate giving the Arduino Cloud a attempt to leverage its full potential to your initiatives. You may discover the premium options for enhanced performance.
You may comply with any responses to this entry via the RSS 2.0 feed.
You may go away a response, or trackback from your personal web site.