


This store billing system is a complete answer aimed toward streamlining transaction administration inside a retail surroundings. Combining Python for graphical consumer interface (GUI) performance and Arduino for controlling a thermal printer (RP203), this progressive system permits customers to enter buyer particulars, choose gadgets from a listing, handle a cart, and seamlessly print payments. Key options embody buyer data enter for personalised billing, stock administration with choices for choosing gadgets, specifying portions, and selecting models of measurement.
The system facilitates cart administration by displaying added gadgets, enabling simple merchandise deletion, and instantaneous complete quantity calculation. It additionally handles unknown gadgets, permitting for his or her addition with computerized quantity calculation. The system structure consists of a Python GUI developed utilizing Tkinter for consumer interplay and Arduino interfacing with the thermal printer for invoice printing, creating a sturdy and environment friendly transaction administration answer for retail settings. To set it up, you will have the elements proven in Invoice of Supplies desk.
| Invoice of supplies | ||
| Parts | Description | Amount |
| Arduino Uno (MOD1) | Growth board | 1 |
| USB Sort C | Adaptor | 1 |
| RP203 (MOD 2) | Thermal printer | 1 |
| 12V, 1A energy adaptor | Energy supply for thermal printer | 1 |
| Jumper wires | Male to feminine | 6 |
Setup and set up
First, set up the ‘Adafruit_Thermal.h’ library for Arduino IDE utilizing the library supervisor. Then, add the thermal printer code offered right here to the Arduino Uno by deciding on the right port and board.
Subsequent, put together the Python code for the store billing system by following these steps:
1. Set up required libraries. Set up Python and required libraries utilizing the next instructions:

pip set up tk
pip set up pyserial
In case you are utilizing Python 3 IDE, use pip3 as an alternative of pip for library set up. In case you are utilizing a Linux system, you additionally want so as to add ‘sudo’ earlier than ‘pip’:
sudo pip3 set up tk
sudo pip set up pyserial
Right here, tk is used to create the GUI, and pyserial is used to speak with the Arduino, which acts because the motherboard to drive the thermal printer module.
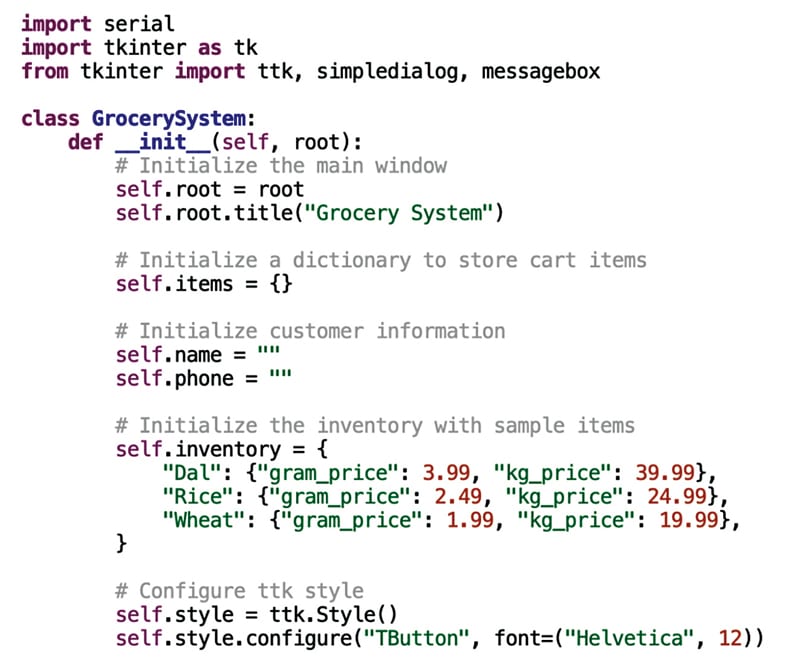
2. For the Python code, import each libraries, create the GUI for the store billing system, after which create and code the operate for billing. You’ll be able to modify the areas, billing choices, and particulars as per your necessities within the code. The GUI code snippet is proven in Fig. 1.

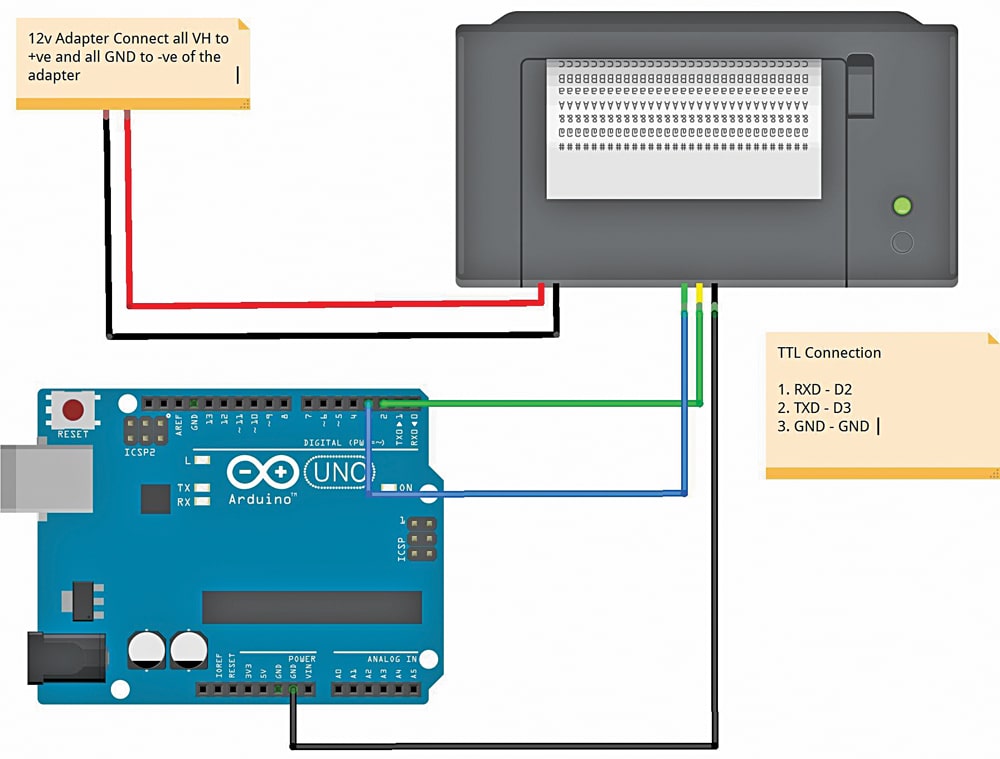
Circuit diagram
The circuit diagram of the venture, proven in Fig. 2, contains the Arduino Uno (MOD1), thermal printer RP203 (MOD2), a 12V, 1A energy adaptor, and some jumper wires.
Testing
After importing the supply code, join the Arduino Uno and energy the thermal printer utilizing the 12V adaptor.
Execute the Python script to launch the GUI. Once you run the Python code, a GUI will seem as proven in Fig. 3.
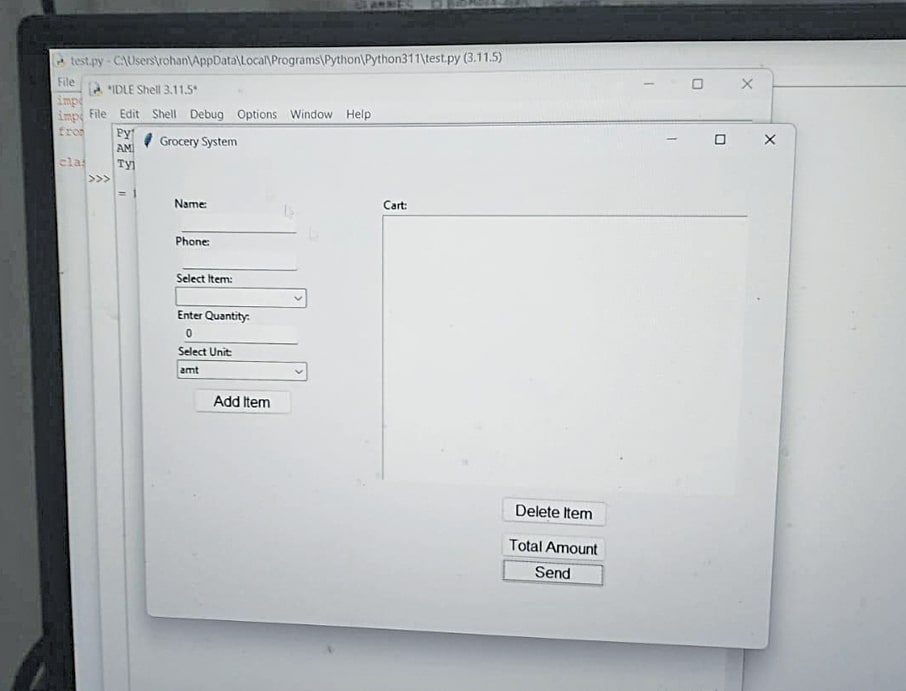
Enter buyer particulars. Enter buyer particulars, together with title and cellphone quantity.
Handle stock. Choose gadgets from the stock, enter amount, and select the unit for every.
Cart administration. Utilise the ‘Delete Merchandise’ button to handle gadgets within the cart.
Whole quantity calculation. Overview the whole quantity after clicking on the ‘Whole Quantity’ button.
Print invoice. Use the ‘Ship’ button to ship information to the Arduino Uno for invoice printing.
Unknown gadgets. For unknown gadgets, use the stock possibility so as to add them, offering the title and worth.

The invoice will print with the offered billing particulars set within the GUI. Fig. 4 exhibits the writer’s prototype printing the invoice.
Congratulations, your personal designed billing machine is prepared!
Troubleshooting
If the thermal printer is unresponsive, examine the Arduino connection and code. Additionally, make sure that the Python surroundings is appropriately arrange with the required libraries.
Rohan Barnwal is an Electronics Fanatic